Taking A Closer Look At Split Ends

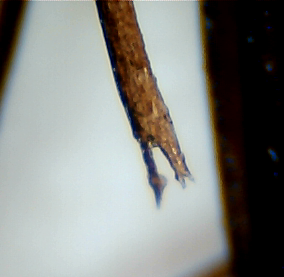
Microscopic image of a split end


Hello Ladies,

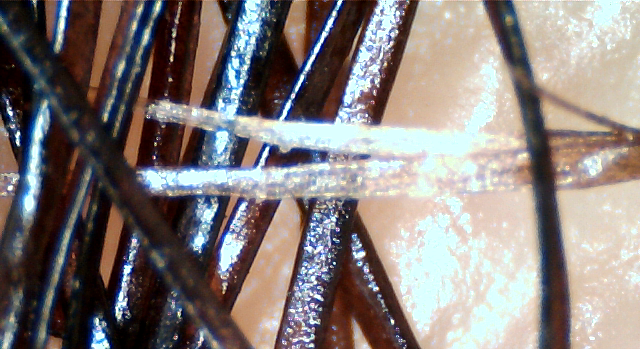
Todays post will be a quick and straight to the point post about split ends, what causes them, how best to get rid of them and a mistake you should avoid when getting rid of split ends.  I will also share some images I have taken with my Trichoscope of split ends which I hope will drive home a few points.


Common Causes of Split Ends

  1. Letting your hair become dry and brittle
  2. Using high levels of direct heat
  3. Excessive and aggressive manipulation
  4. Lack of protective styles
  5. Sleeping on cotton pillow cases without a satin scarf or bonnet


Facts About Split Ends

  1. Split ends cannot be repaired. Do not let any product manufacturer fool you.  Hair products can only make split ends look better temporarily.  The only permanent solution to split ends is to cut them off.

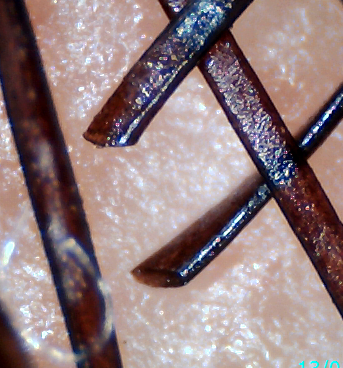
Healthy End Cut with Hair Shears (scissors)


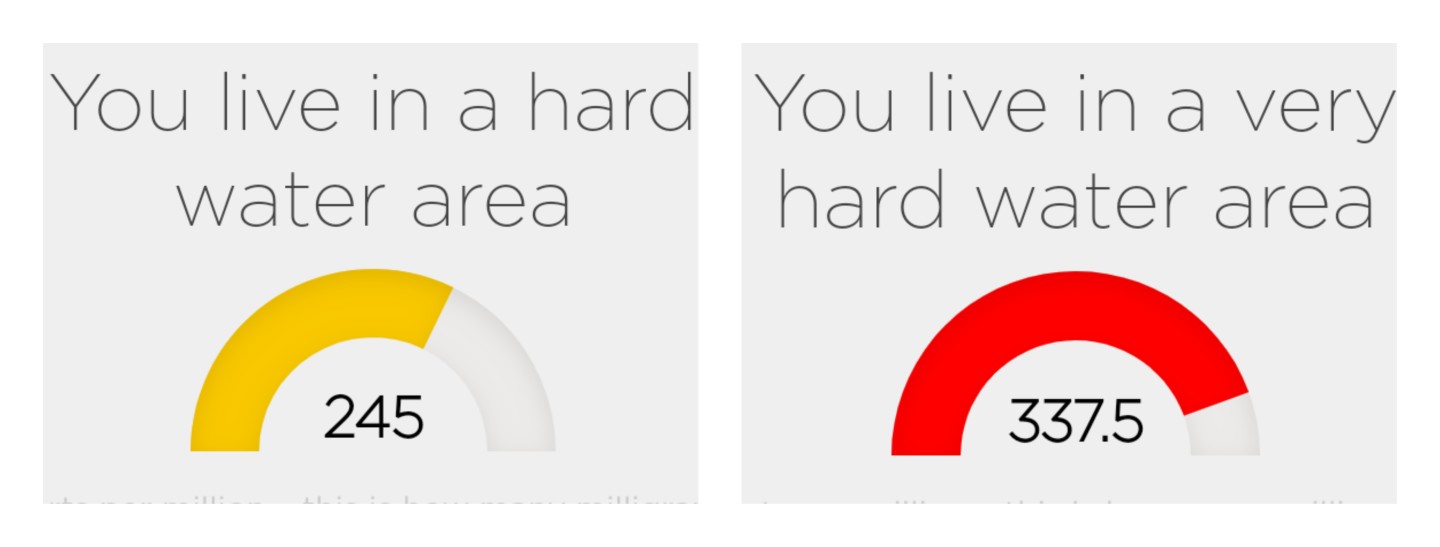
  1. Cutting off split ends with regular scissors will result in ends that are not sharp and will fray and split much more quickly. I can back up this fact with my own experience.  When I began using proper hair scissors to cut my hair, my ends stayed split free for longer.  My trimmed ends seemed to take much longer before they are in need of a trim (aside from when I had hard water issues which you can read about in my last post).


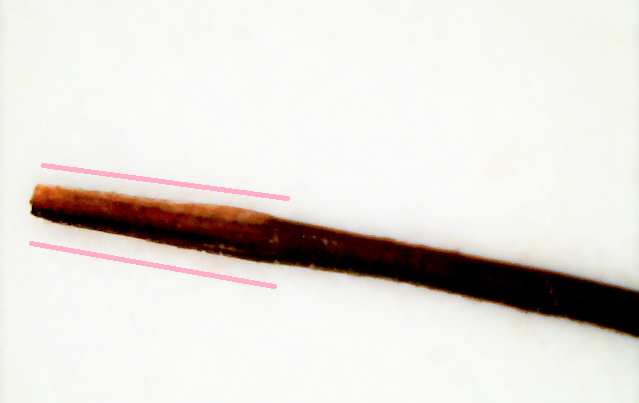
  1. A mistake many ladies make when they happen to spot a split end in their hair or a single strand knot to pull it off. This is the worst thing you can do.  You would be better off leaving the split end in your hair than pulling it off with your fingers.  When a split end or single strand knot is pulled off or broken off with our fingers, we create a very damaged and thin end.  Pulling, breaking or tearing off a split end also tends to create a new damaged that tends to be long and tapered, basically you create a much larger area of damage.I captured the image below after tearing off a split end and you can see the end has a long area of damage which I have indicated with the pink marks.  Also, if you look closely, you will see that the cortex layer (inner layer) of the hair which looks like a like a tube in the picture below is now exposed and visible. Pulling off the split end tore off the cuticle layer which is supposed to protect the inner layer.

139 - Copy

I hope seeing what happens to ends that are torn or broken off with our hands deters you from do that your hair.  It certainly worked for me and now I tend to grab my scissor when I find a single stand knot in my hair rather than snap them off like I used to.  A good time to do this is when you are detangling and moisturising your hair, have your hair scissor nearby so you are not tempted to snap off the knot or split end.

The best way to fight split ends is to avoid getting them in the first place by being consistent with your regimen.  Keep your hair moisturised and sealed especially the ends.  And if your ends are damaged and /or just very old and weathered, cut it off, do it in stages if that’s what you feel comfortable doing.


I am hope you found this post useful. See you soon for my next post, I haven’t decided what the topic will be yet but…..it will be good. : )


X

Lade


Texlax Update April 2018: Part 2

Hello Ladies

As promised, in this post I am going to share pictures of my hair which I texlaxed a month ago.  I am also discussing the major challenge I had with my hair last year, how it led to me cutting off over 5 inches off my hair and how I managed to maintain waist length hair despite the cut.

I failed ladies, I failed in getting pictures of my hair blow out.  I had reserved a day to get my wash and a few other things done but then I had a really bad fever so wash day was cancelled.  I washed it eventually the next day when I felt better but I air dried.  If you are new to Hairducation and my texlaxed hair you may not know that it shrinks when I air dry it so my hair looks shorter than its blown out length.  For anyone who wants to see my blown out length you will see it in my highlights on my IG page later today.  So with that said, the pictures in the post were taken on my last wash day when my hair was dry but my roots were still very damp.


My Major Hair Challenge from 2017

I moved to the UK for 9 months in March last year and arrived with hair that was in my opinion, the best it had ever been.  After a few months it just didn’t feel the same way, it tangled more, seemed to be changing colour and felt different and not in a good way. My hair looked okay but if didn’t feel as good as it should have.   I was baffled because I was keeping up with my regimen despite my crazy schedule at the time and using products that worked well for my hair.

I texlaxed in September 2017 and was shocked by how bad my ends were tangling even after deep conditioning.  Ladies when I say tangles, I mean grab a scissors and cut me out tangles.  For the first time in a long time I had to trim my ends because it needed a trim.  Usually I trim my hair on texlax day to keep my hair at waist length.  But this time those ends HAD to go so I trimmed off two inches and was still waist length.
By October I looked at my ends and thought hold up, I need another trim???? Why??? I’ve been good to my hair so why are my ends looking busted.   I trimmed off about an inch and half and my hair felt so much better.   Giving the issue some thought I realised it was the hard water prevalent in many parts of the UK.
The mineral in hard water penetrates the cracks of hair fibres and cannot be removed by normal shampoos.  The more porous the hair fibre is, the deeper and more affected the hair will be by the minerals.  The mineral will form a coating on the hair and prevent your hair products from working.  This will lead to discoloured and very dry hair which tangles and breaks.

I remembered how badly hard water affects my hair and decided to start chelating my hair once a month.  I was sure that would fix it because I had grown my hair from shoulder length to bra strap length in a hard water area of the UK following my current regimen.  I was convinced that increasing the regularity of my chelating would suffice.

After my return to Nigeria at the end of 2017, I began to panick because my hair was still acting crazy despite no longer being in a hard water area.  I could no longer predict how my would respond to products or techniques.  So being a research prone person, I dug deeper and found out exactly what the issue was.  It was……….hard water.  Yes …that was still the cause.  The residue of hard water was still in my hair and that was what was causing all the havoc.

I was puzzled  and didn’t understand why the hard water had such a horrible effect on my hair in comparison to my earlier years in the UK.  I carried out further research and discovered something I never realised.  There are varying levels of hard water.  Through my research I found that the area I lived in at the earlier part of my hair journey had hard water whilst the area I lived in in 2017 had extreme levels of hard water. You can compare the levels in the image below.

Despite my return to Nigeria, I realised I probably still had some hard-core mineral residue on my hair fibres.  I purchased and used a very strong swimmers shampoo by a brand called Ion.  I washed a second time with my Cream of Nature Argan Oil shampoo and deep conditioned as  normal. The difference to my hair was immediate but I trimmed off another two inches to get rid of thinned out ends.  I also realised why my ends bared the brunt of the hard water damage.  The ends of hair are the most porous parts of hair and as I mentioned earlier in this post, the more porous the hair, the more damage it will sustain from the hard water. The key lesson here is that for ladies who live in countries with hard water, find a way to check your hard water levels.  If it is high, consider getting a shower head hard water filter and use a strong chelating shampoo every 3 to four months to remove the minerals that may be on your hair fibres.  Don’t let hard water wreck your hair like it almost did mine.


My hair has been doing great since then and I am back to being happy with it and I hope you have learnt a thing or two from my experience.

Have you had any challenges with your hair recently?  How are you bouncing back from it?

My next post will be an educative post about split and damaged ends.  I will be sharing a few microscopic images of healthy and damaged ends. There will be loads to learn so see you soon

X

Lade

Learn | Change | Grow

Texlax Update April 2018: Part 1

Hello ladies,

I hope your hair journeys are going well and that your hair is well hydrated and breakage free😊

I finally texlaxed my hair!!!!  To be exact I did the texlax on the 16th April, just over two weeks ago. My schedule on my texlax day meant I didn’t have time to stop to take pictures.  I have had one wash day since I texlaxed but again I didn’t get round to using my camera but I did take some short videos using my phone.

If you follow me on Instagram, you may have seen one of the videos.  I will share some screen shots of the video in this post and will put up the rest of the videos on my Instagram stories.  In this post I will share how my texlax day went, my texlax process and then share the pictures which show my current length.


My Texlax Day and Process.

Ladies, almost 7 months of new growth is not a joke.  After my Ready Steady wash day, I wore my hair in a simple bun up-do for 4 days.  I detangled and moisturised and sealed lightly during the week. By day 5, my texlax day, my hair felt a little matted and dry, why??  I had used very little moisturiser during the week as I didn’t want my hair to feel or get wet because wet hair isn’t supposed to be relaxed.  Also, although I detangled regularly , because I didn’t want  to aggravate my scalp, I didn’t pull or stretch my new growth, so it had shrunk and matted  a bit. The point I am trying to get to is that preparing my hair on my texlax day took a while because of the amount of new growth I had to detangle very gently.  Detangling 20inches plus of hair in small sections is time consuming.

After I got through prepping my hair, the rest of the texlax day was a breeze.  I followed my usual process and timings which you can read by clicking here.


My Current Length
After applying my leave-ins, I blow dried in sections and I cut two inches off my ends because I do not want longer hair.  I am maintaining waist length.  In the pictures in this post the black belt is my waist line.  My hair is a little longer than waist length so I will trim off an additional inch in a few weeks.


Currently my hair is doing quite well, and I will have it out for a while before the wigs make a comeback. Although this is more of a hair update post, I hope you have learnt something new from my relaxer process.  Have your relaxed or texlaxed your hair recently?  How did it go?


I mentioned in my last post that my hair faced some major challenges over the last year.  In my next post I will share more about how bad it got, how it led to me cutting off 5 inches off and how I grew the hair back and how I got my hair to grow faster than normal.  You don’t want to miss it.  I should have taken proper relaxer update pictures by then too….so see you soon.

x

Lade

Learn | Change | Grow