47 ROLLERS: MY FIRST ROLLER SET

Hello ladies

I hope you have been well and had a good break over Easter.

I know I am a little overdue for a blog post.  Unfortunately I was a little unwell over Easter (tummy bug, cold and fever), when I got back into the swing of things my laptop went weird (apparently my OS has been corrupted).  I am using my mum’s laptop for the moment and was getting on with part two of the texlax series.  I always do a first draft of blog posts on paper and had just finished writing out the texlax post.  I left the room for a second and returned to find my dog eating it…yes the dog literally ate my blog post.:)
I’ve thrown in the towel and will try to get part two up in a few days.

Rollerset


In the mean time I thought I should share some pictures of my first ever roller set since I began my hair journey.  I can be a little lazy with styling my hair.  I’ve always wanted to do a roller set but the thought of the time it would take usually put me off.  I had a photo shoot about two weeks ago for an upcoming project and decided it was now or never.

Roller set5

I washed my hair the day before and deep conditioned overnight.  In the morning I rinsed out the deep conditioner and unravelled the box braids (aka calabar to us Nigerian ladies).  I applied my leave-ins and blow dried with cool air.
I sectioned small amounts of my hair, combed through gently, sprayed it very lightly with some water, applied a little bit of Cantu Shea Butter conditioning cream and rolled up the section.  The reason I blow dried my hair and re-wet it is because I avoid sectioning or manipulating my hair when it is wet.  I get loads of tangles and breakage if I try to work on my wet hair, so I am better of handling it when it is dry.
I used my soft hood drier to dry my hair.  Because my hair was semi dry already, I only kept the hood on for an hour.  I started working on my hair at 9am that morning and took out the rollers at 3pm.  Yes it took me 6 hours to rinse, undo box braids, detangle, apply leaves, dry, re-wet in sections, roller set and re-dry my hair!!!!!  This is why I love buns.  It takes me 30 seconds to put my hair in a bun.


rollerset collage 2

At the risk of coming across as narcissistic, I LOVED the result.  I had been eager to see what my hair would look like with a roller set and I truly loved how it turned out.  When I took out the rollers, the curls were really springy, I jumped up and down in front of the mirror for a while, then I went and found my mum and jumped up and down for her, then I went looking for my sister and jumped some more.

The shoot went well although I felt really silly half the time, despite how these pictures look I really hate posing for pictures.   My mum and sis were there and we all had a bit of a laugh until the Lagos heat took its toll.  The curls started dropping quite quickly and we called it a day. When I got back home, I took some pictures of my hair when the curls had dropped, then did what I do best: put it in a bun.

Rollerset Collage 1

I am glad I finally got the roller set out of the way and think I did okay even though it was my first attempt.  Will I do it again soon? Probably not but only because I am a lazy self stylist.  But who knows, maybe I will for a really special occasion.

What have you been up to with your hair?  Has anyone tried something new recently?  Please share and please come back soon for the second half of the texlax blog post.

X

Lade

Learn | Change | Grow


TEXLAXING (PART 1) – THE PROS & CONS OF TEXLAXING

Hello ladies, how are you?  Good I hope.  I’ve been a little behind on blog posts and my emails, due to life being really busy and some network issues.  Thanks for sticking around.

As promised, in this blog post I will explain what texlaxing is and the pros and cons of texlaxing.  This is going to be a two part post.
I never explained why I have blog posts in two parts.  If a blog post goes over a thousand words I decide to split it into parts.  I know that the longer a post the less inclined people are to read it.  So I try to keep the posts short(ish) and sweet. So let’s get to it.

WHAT IS TEXLAXING

Texlaxing simply means deliberately under processing your hair when getting it relaxed.  Ladies who texlax their hair don’t allow it to become completely straight during the relaxing process.
Texlaxing is often confused with texturizing.  A texturizer is designed to loosen the curl pattern of our hair, it is not designed to straighten it.  Relaxers (used for texlaxing) on the other hand are designed to straighten our hair.

BENEFITS OF TEXLAXING

Texlaxed vs Relaxed

1)HEALTHIER HAIR
Now what I am about to say might not be what some ladies want to hear but I would like to keep it honest with you.  Natural hair that is well taken care of is healthier than relaxed hair.  Texlaxed hair that is well taken care of is healthier than relaxed hair.  Relaxed hair can still be healthy if it is well taken care of.   As I have mentioned on many blog posts, relaxers and chemical hair dyes work by destroying some of our hair fibres internal protein bonds.

The further away we stray from our hairs natural texture and colour the more damage we cause.  So basically the straighter we allow our hair to become during relaxing, the more damage is done to our hair fibres to achieve that straightness.  As an example a lady who lets her hair become 75% straight will have healthier hair than one who lets her hair become 100% straight (if both of them are on a hair journey that is).

2) BETTER ELASTICITY :LESS BREAKAGE
Because a bit of the natural texture is left in texlaxed hair and it has suffered less internal  and external damage, texlaxed hair tends to retain more of its natural elasticity and bounce.  The more elasticity our hair has the better it is at resisting breakage.

3) THICKER HAIR
This is the MAIN reason why I switched to texlaxing.  I like how thick it made my hair look.
Because texlaxed hair has some curl/kink left in the hair, it looks thicker than it would if the hair was allowed to become completely straightened.

4) BETTER MOISTURE RETENTION
Hair fibres with good protein bond retain moisture better than hair with little or no protein bonds.  Ladies with texlaxed hair have not broken all the protein bonds in their hair and therefore retain moisture better.  Remember hair that is well moisturised faces less risk on breakage.


CONS OF TEXLAXING

Texlax cons collage


1) UNEVEN TEXTURES

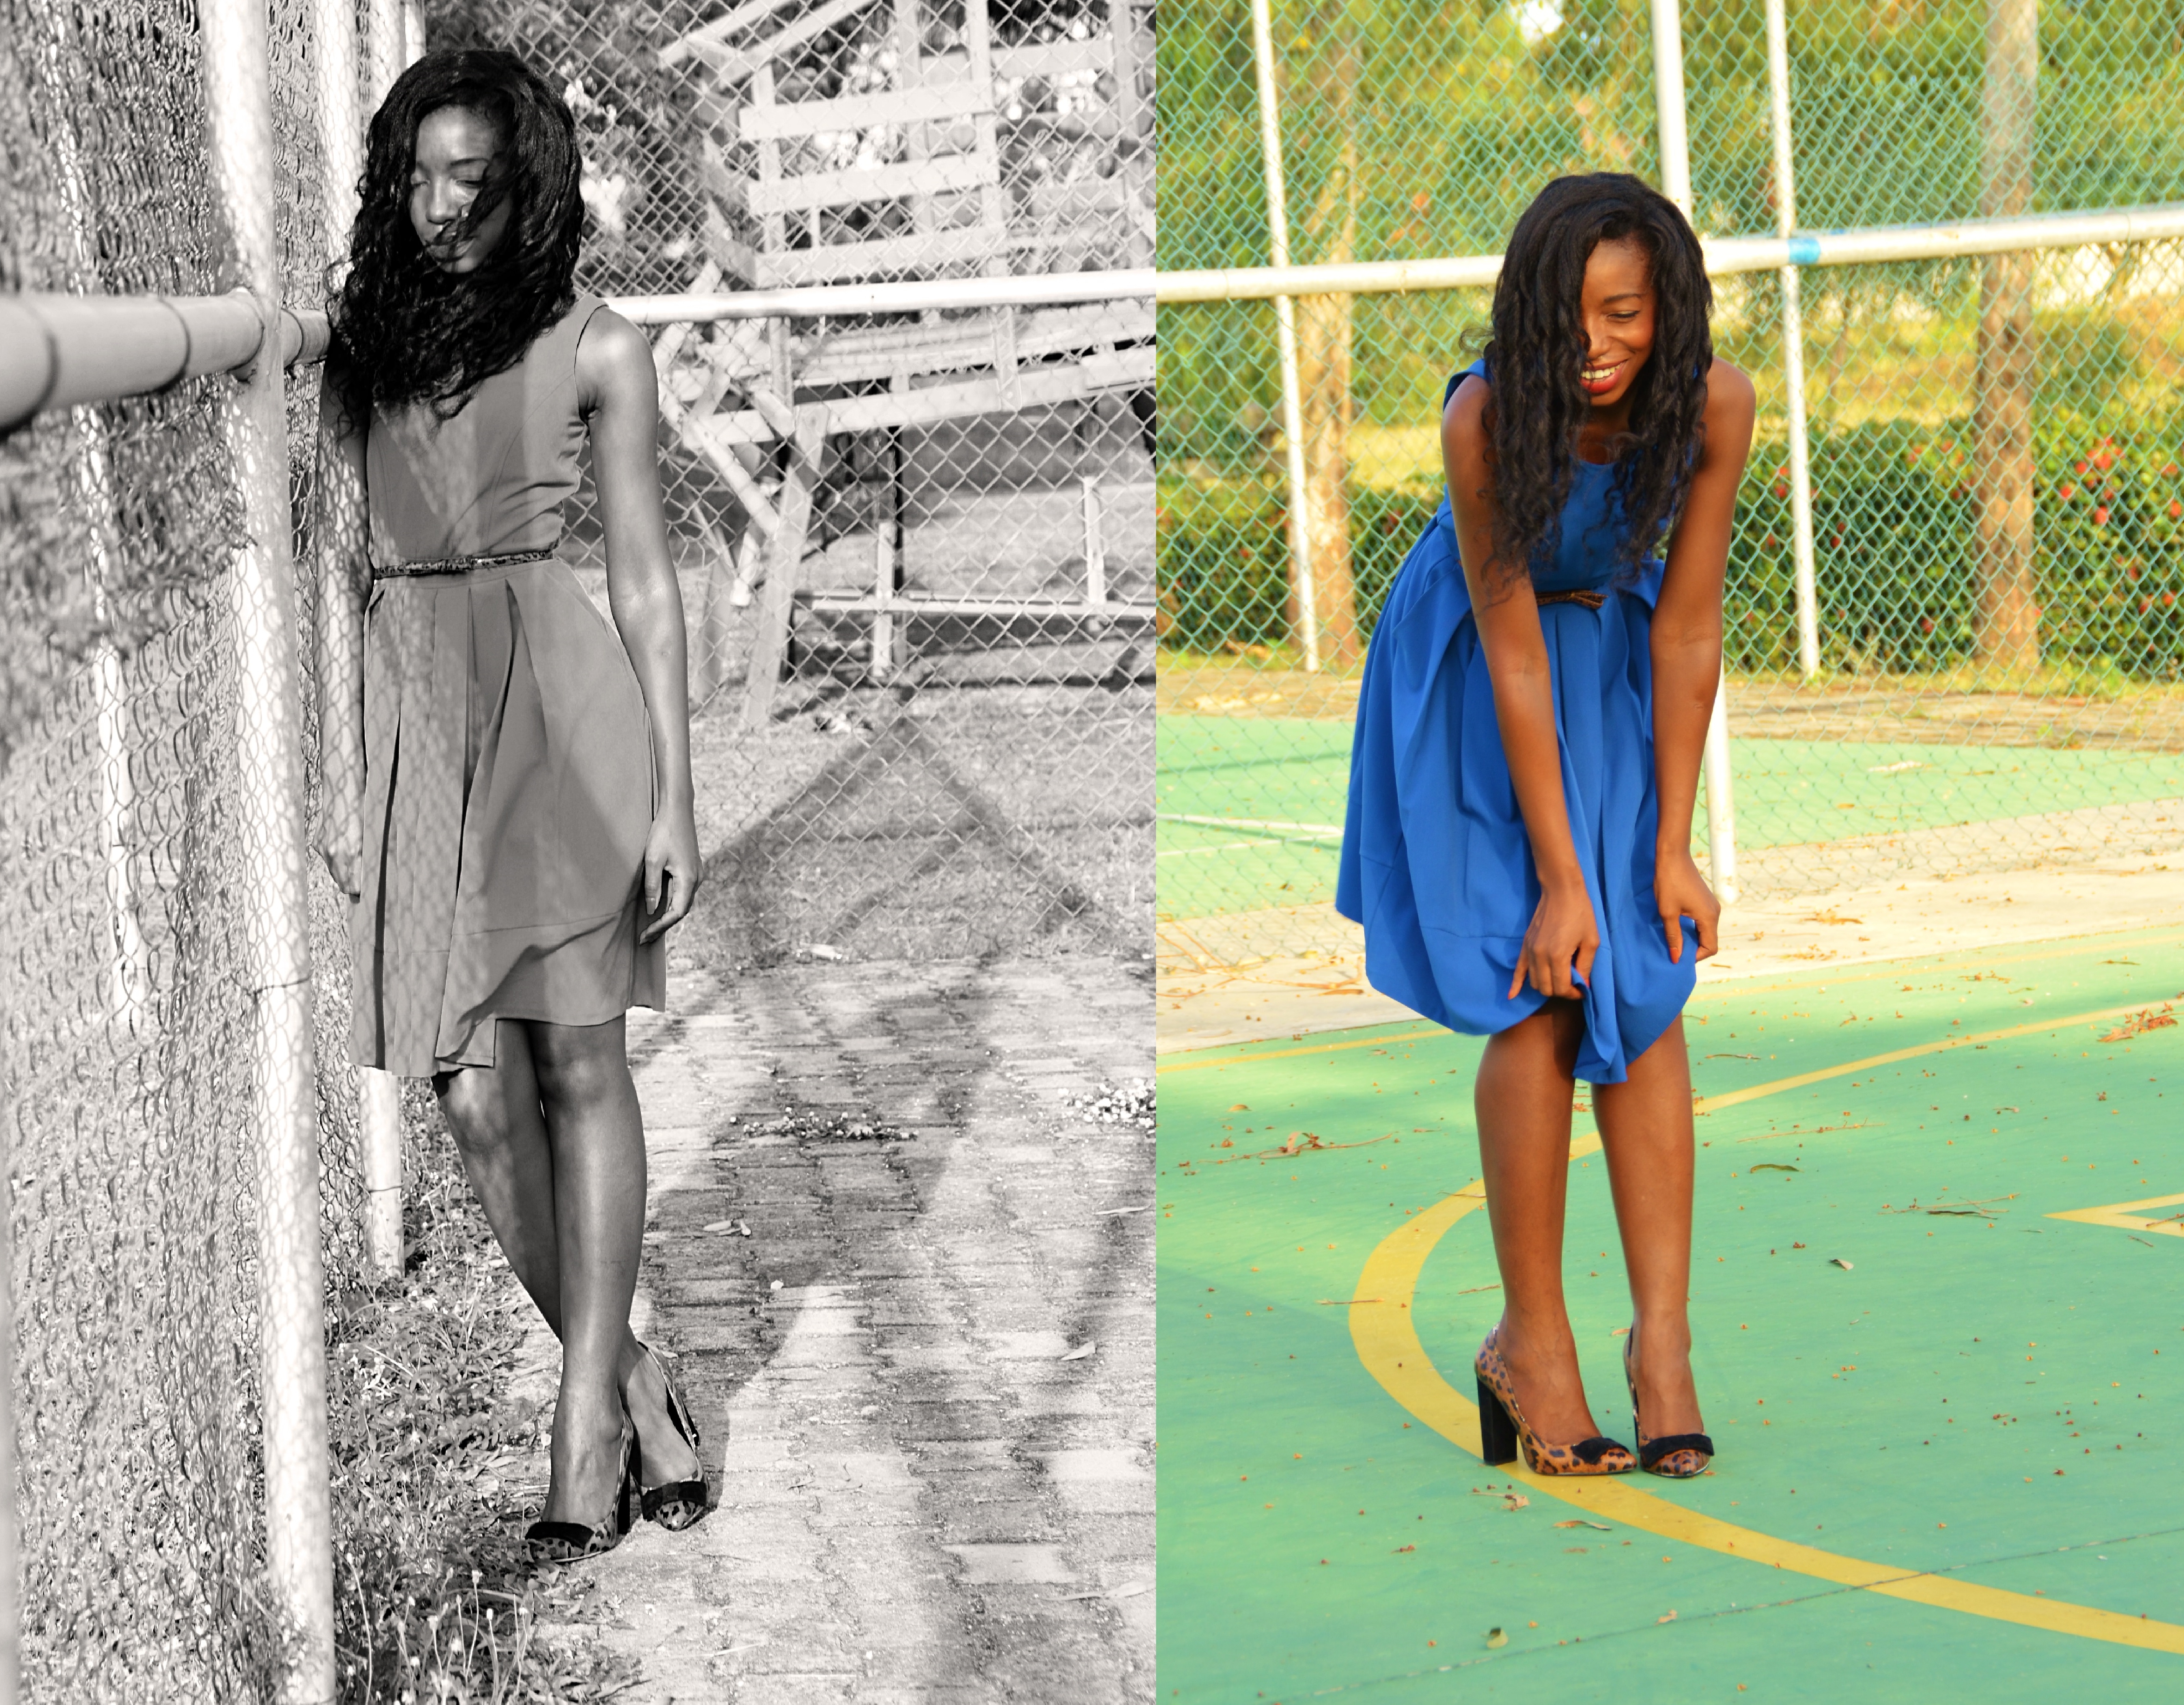
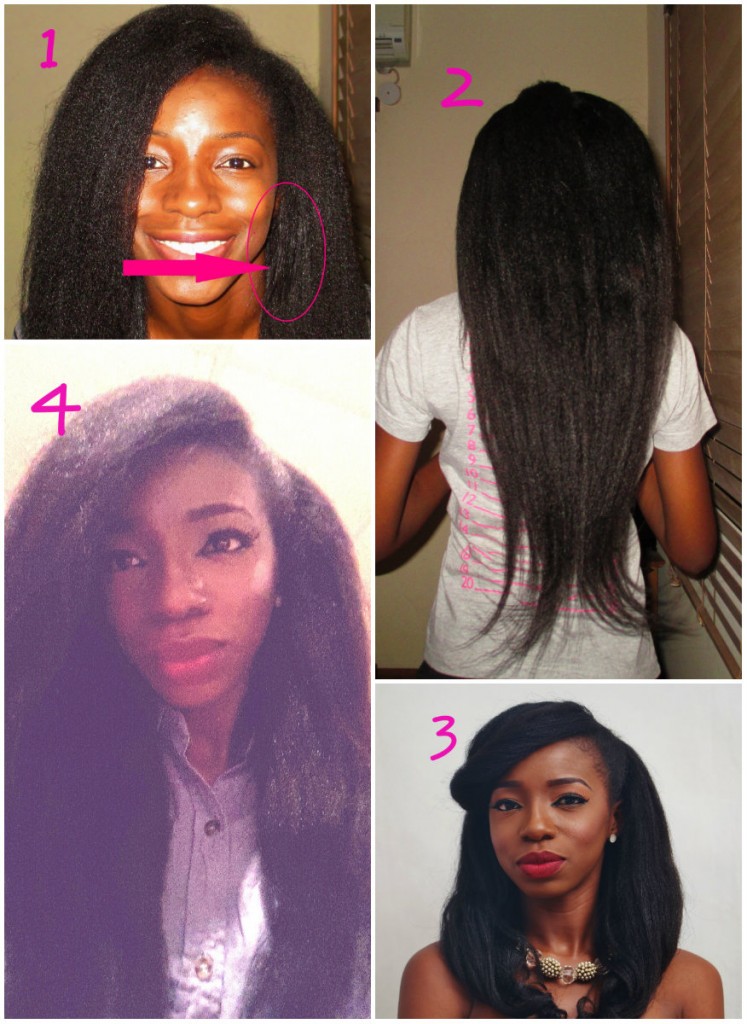
A very common problem ladies with texlaxed hair face is uneven textures.  This simply means that some areas of your hair may be straighter than other areas and some parts may retain more of your natural curls. Please see the circled area of picture 1 in the collage above.

This inconsistency in textures occurs due to many reasons, for example, some parts of our hair fibres may have tighter curls than parts  so this unevenness continues with our texlaxed hair.
Another reason is that the texlaxed texture we achieve in one relaxing session may be different from what we achieve the next time we relax.  It takes a few sessions of texlaxing to learn how to achieve the degree of straightness that you want and then you have to recreate it every time you relax so that you have an even texlaxed texture.

The uneven texture actually isn’t that obvious when your hair is dry, personally I don’t think it looks too bad.  Unfortunately however, some ladies might find it a bit difficult to manage the different textures in their hair and suffer some breakage as a result of it.   Imagine a lady who is transitioning to texlaxed hair and is on a stretch, she will have her natural new growth, her texlaxed hair and her relaxed ends.  It is certainly a bit of a challenge to keep three textures happy however I assure you it can be done but it is a little time consuming.
Please read the following blog posts as they contain tips that help manage uneven textures: hair care in sections and the art of stretching part 2.


2) POTENTIAL FRIZZ
The look of texlaxed hair isn’t to every ones liking.  I personally love the look of texlaxed hair.  To me it looks like natural hair that has been blow dried.   However some ladies are not so keen on this look and prefer poker straight silky looking hair and that is alright too.
Ladies with texlaxed hair can easily achieved the poker straight look by blow drying, roller setting or flat ironing their hair.
I must say that texlaxed hair that isn’t well moisturised can look frizzy.  Ladies who texlaxed shouldn’t skip moisturising and sealing their hair.

3) THINNER LOOKING ENDS
As I mentioned above, ladies who texlax their hair tend to have fuller looking hair than what it would be if they relaxed bone straight. When ladies are transitioning from relaxed to texlaxed, their previously relaxed hair usually looks thinner than the texlaxed parts.  It takes a while to get used to this.  Over the years you can gradually trim of the relaxed bits.
The difference in textures is more apparent when your hair is wet.

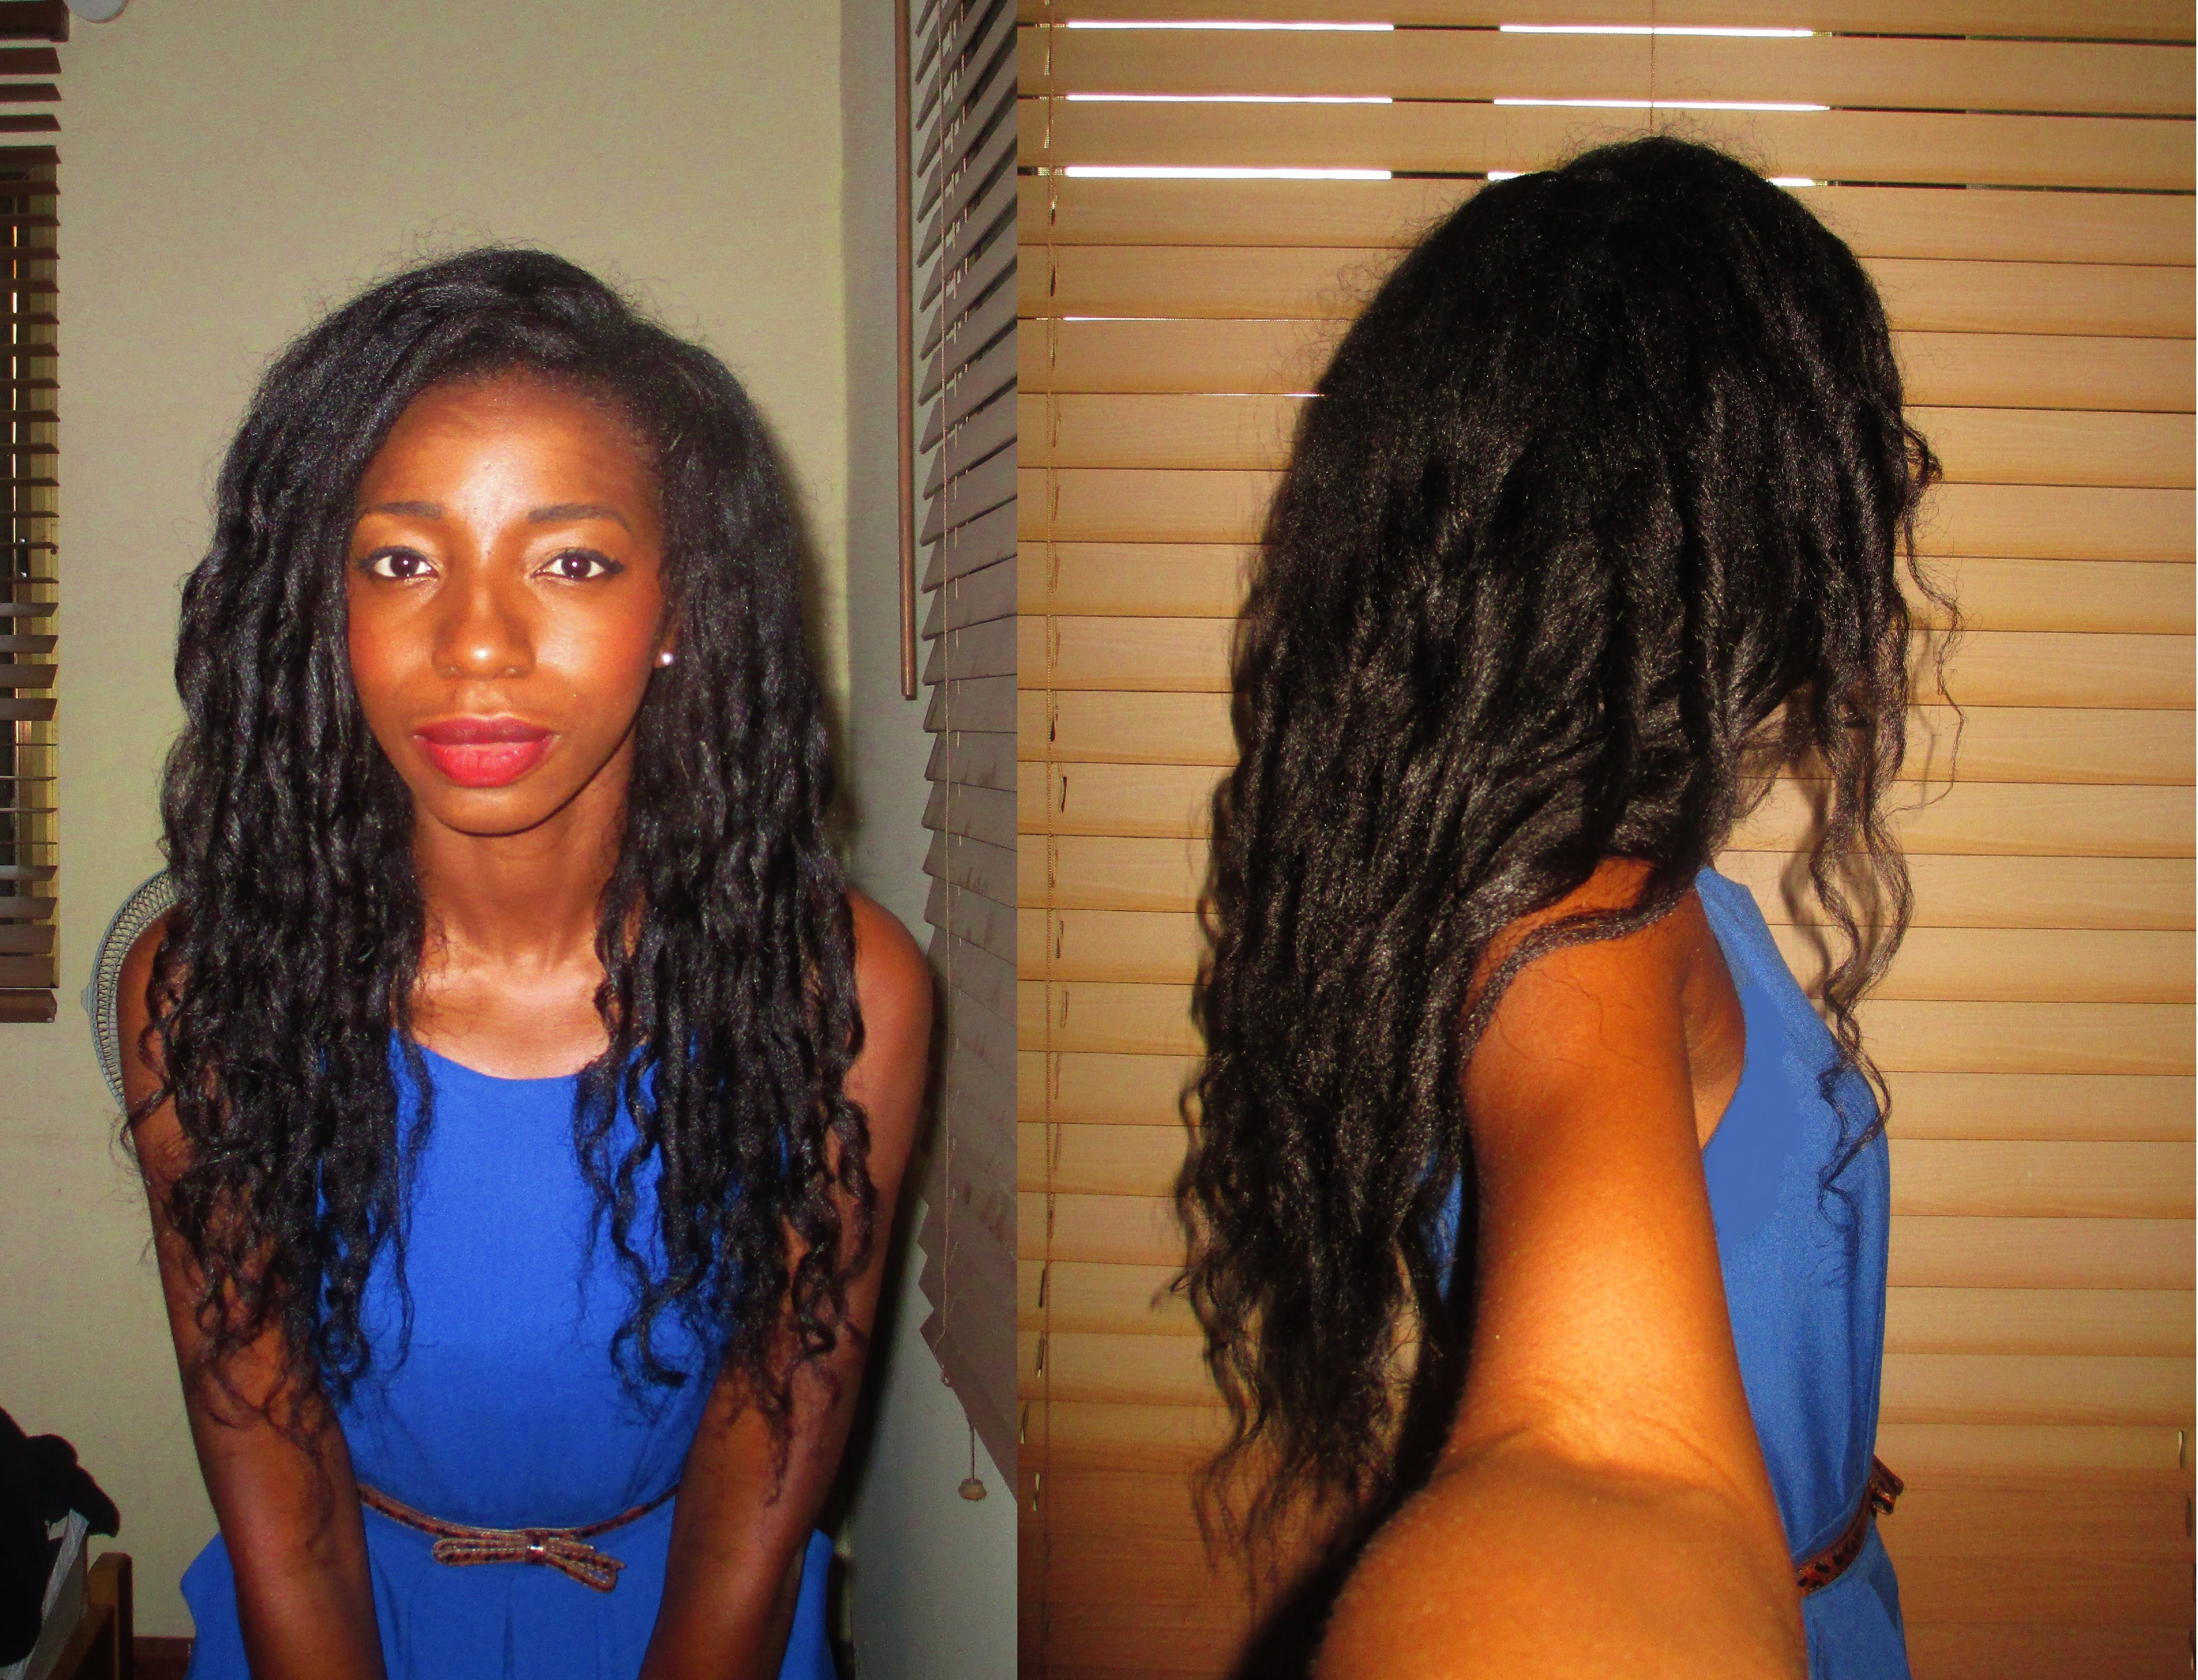
A second reason for thinner looking ends that I have just  discovered is for ladies like myself have finished the transition and are fully texlaxed.  As I mentioned above we have uneven textures and some parts of our hair ends up being straighter than we intended ( this usually occurs when we are still new to texlaxing).  As our hair grows and gets trimmed those straighter thinner looking parts eventually become the ends of our hair.  Currently I think the ends my hair is hair that was accidentally relaxed bone straight and now looks thin in comparison to the rest of my hair.  This can be seen in picture 2 of the collage above (My hair had been cross wrapped the night before and that’s why my ends are bent in the picture).

4) SHRINKAGE
This is my favourite con about texlaxed hair.  By retaining some of our curls/kinks we also retain some attributes of natural hair.  Natural ladies hair shrinks and so does that of texlaxed ladies. Obviously the degree of shrinkage is not as dramatic as natural haired ladies
The more curl/kink you leave in your hair the more it is going to shrink.  My hair shrinks from waist length to between BSL and MBL especially on wash days.  As the week goes by it stretches out bit by bit. I am used to the yoyo effect my hair has.  Personally, I really don’t mind, as a matter of fact I kinda like it.  It keeps things interesting.
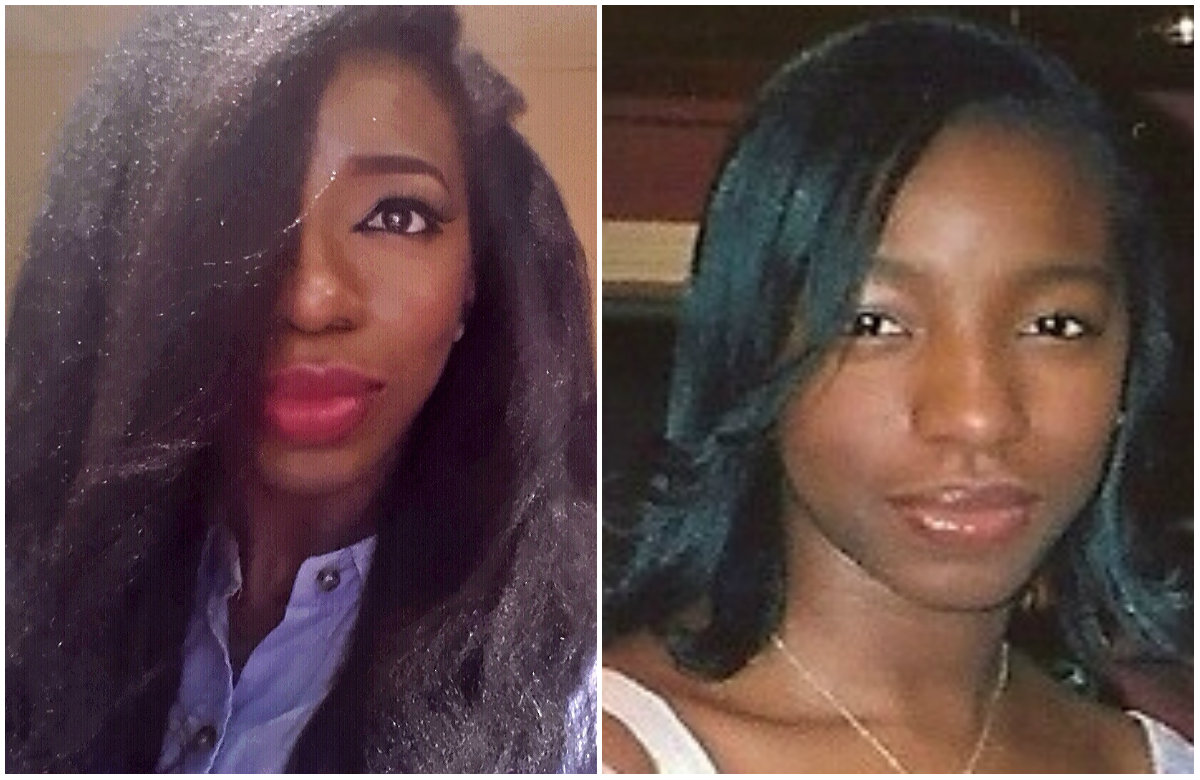
As an example, picture 3 and 4 of the collage above were taken on the same day yet the length of my hair is quite different.
If you think you might want to transition to texlaxed, please know that you are not going to see your true length everyday unless you blow dry, roller set or flat iron.  As you know using heat too often should be avoided, so if you want see your full length more regularly you may be better of relaxing bone straight and having a solid hair care regimen.

Well that is it for this post.   I hope you don’t think the cons outweigh the benefits of texlaxing.
In part two I will talk about methods of texlaxing, how I transitioned to texlaxed and my current methods for texlaxing my hair.
I hope you’ve found this blog post to be a worthwhile and will come back soon for part two.

Before I sign off, I want to say a genuine thank you to all the lovely people I’ve met recently who tell me they love Hairducation.  I have also received some emails from ladies telling me to keep up with the good work.  I just want to say thank you and that your kind words do really keep me motivated.  Blogging takes more time than I thought it would but the support I’ve gotten from you all makes it more than worthwhile.

Happy hair journey ladies and happy Palm Sunday.

x

Lade

Learn | Change | Grow

DANDRUFF & TIPS FOR GETTING RID OF IT

Hello ladies,

I hope you have been well and that life is being good to you.
I have been asked by several ladies for advice about dandruff and remedies to make it go away.  I have never suffered from dandruff myself but over the years of my hair journey I have learnt about it. In this blog post I will attempt to explain what dandruff is, what causes it and ways to treat its symptoms.


WHAT IS DANDRUFF
dandruff 2

Dandruff is a scalp condition characterised by a flaky and itchy scalp.  It is often confused with dry scalp or other scalp conditions with similar symptoms such as eczema.
The flakes from dandruff can be embarrassing, the itch is annoying and unfortunately dandruff can lead to some hair loss.

WHAT CAUSES DANDRUFF

Our bodies are covered internally and externally with many varieties of bacteria and fungi.  This is normal.
Dandruff occurs when the fungi on our scalp grows or is produced at a higher rate than normal. The increase of fungus on the scalp causes a change to the composition of the sebum on our scalp.  The increase of the fungus and alteration of our scalp sebum causes the cells on the scalp to become less adhesive and flaky.


TREATMENTS FOR DANDRUFF

Anti dandruff shampoo collage

Some examples of anti-dandruff shampoos.

Anti-dandruff shampoos are produced by companies which usually have the funds to carry out extensive research before creating their products. They’ve done their homework and their shampoos should relieve the symptoms of dandruff.
If you do have dandruff, regular cleansing with anti-dandruff shampoo should help (if you follow the given instructions).
If it does not you should see a dermatologist or trichologist to:

–  confirm whether or not what you have is actually dandruff or another scalp condition.
– prescribe a stronger anti-dandruff shampoo or soothing cream and generally to help you manage the condition.


NATURAL REMEDIES FOR DANDRUFF

The suggestions below are some home treatments for dandruff which ladies on various hair care forums have claimed helped stopped their dandruff.  I cannot guarantee that these methods will work for you.  In fact some remedies which some women claimed worked for them made the condition worse in other ladies.

Remember my advice is that you seek medical advice from a dermatologist if anti-dandruff products have not helped.  However I realise that several women like  to try natural remedies.  So on that note please see the information below.


1) NATURAL OILS

 A) Pure extra virgin coconut oil
Several ladies on hair care forums claim that massaging a small amount of coconut oil into their scalp helped to relieve their dandruff.
A cause of concern for me is that coconut oil contains oleic acid.  Whilst doing research on dandruff, I read that the fungus which causes dandruff actually feeds on oleic acid.  So if anything,  using coconut oil on your scalp if you have dandruff may worsen the condition.
Please note that olive oil and castor oil also contain oleic acid.  As I mentioned above some ladies claim that this worked for them.  It may work for you but note that it could potentially make it worse.

B) Neem Oil
Neem oil has antibacterial and antifungal properties.

C) Pure Tea Tree oil or pure rosemary oil
These also have antifungal and anti bacterial properties.  As these are essential oils, a few drops must be added to carrier oil before being applied to the scalp.
Please do not use essential oils if you are pregnant unless you have been permitted to do so by your doctor.

How to use oils for treating dandruff

i) Pre-shampoo treatment –a few drops of tea-tree or rosemary oil should be added to coconut oil or neem oil.  Massage the mixture into your scalp.  Leave on for a few hours before you shampoo.

ii) Shampoo – add a few drops of tea-tree or rosemary oil to your shampoo. Wash and rinse thoroughly.

iii) Scalp massages –twice/three times  mix a few drops of tea tree oil or rosemary oil with coconut or neem oil.  The mix can be massaged to your scalp twice or three times a week.


2) APPLE CIDER VINEGAR (ACV)

Apple cider vinegar

This is another natural product which has antibacterial and antifungal properties.
An apple cider treatment can be used as a final rinse after washing and deep conditioning your hair.

How To use Apple Cider For Treating Dandruff
Mix one quarter of a cup of apple cider vinegar with 2 cups of cool water.  After washing and rinsing out the deep conditioner from your hair, pour the mixture over your hair and scalp.
Take care not to let any get into your eyes. If you have any unhealed scab on your scalp it will sting a little. (If it does, just rinse the affected are with water)
You can either use the mix as your final rinse or you can leave the mix on your hair and scalp for 10/15 minutes and then rinse it off using cool water.
Apply your leave in conditioners, detangle and air dry or blow dry your hair using cool air.


3) RAW/CRUDE HONEY
Raw crude honey collage

Yes you guessed it.  Honey has antibacterial, antifungal and antioxidant properties.
In clinical studies carried out in 2001, honey was found to be very effective in treating dandruff.
Of all the natural remedies out there this is by far my favourite because it is backed by research showing that it is effective.
To find out how honey can be used to treat dandruff and for more information about the 2001 study please click on this link.  You’ll be glad you did.


These are not the only natural treatments for dandruff but I decide to focus on these three.
This post is longer than I intended it to be but I am glad I’ve got it all out in one blog post.  If you suffer (or think you suffer from) dandruff, I hope you have found this helpful.
Because dandruff is a medical condition I think it is important for me to state that this post is not intended to provide medical advice, diagnosis or treatment.


I am truly looking forward to writing my next blog post about texlaxing.  It is something that is really close to my heart (hair wise).  I intend to explain what texlaxing is, the pros and cons of texlaxing, methods of texlaxing, how I transitioned to texlaxing and how I currently texlax my hair.

transition to texlaxed hair

Texlaxing changed my hair from limp to full and a tad bit wild (which I love)

So if you want to know how I changed the thickness of my hair, please come back soon.

Stay blessed ladies.

X
Lade

Learn| Change | Grow